What are welcome email flows?
The essential. The most important. The most impactful. The most welcoming. That’s how the Welcome flow can be summarized.
In simple terms, the Welcome flow is the sequence of emails sent after a user has submitted their email through one of your email capturing forms (e.g., popup forms, footer forms, quizzes, etc.).
It targets top-of-the-funnel users who are new to your list and haven’t bought from you before. This should be taken into account when crafting the strategy around the welcome flow (more on this down below).
There are 2 common misconceptions about it…
First, it’s often confused with the Post-Purchase flow that’s sent after purchase. We’ve often seen in new client accounts Post-Purchase flows made for people who just bought called “Welcome flows”.
Another misconception is when email marketers set it up to be sent to any new subscriber, no matter where they subscribed from.
The Welcome flows should only be sent to people who opted in from the website forms, excluding checkout (this is when the Abandoned Cart flow is sent).
How do Welcome flows generate revenue, and how impactful can they be?
You can look at the Welcome flow as a tool to engage your new email subscribers, educate them about you and your product, and send them offers. That way, all new members are nurtured and motivated to buy from you.
Here is how efficient the Welcome flow can be if you do everything right:
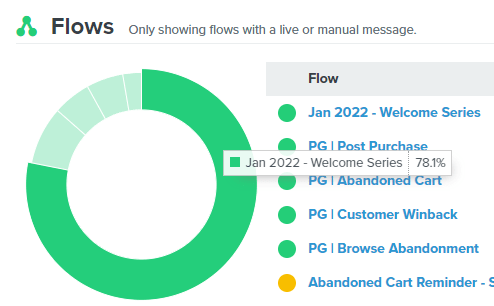
As you can see, in some accounts, more than half of all flow revenue comes only from this flow.
How do I set up the Welcome flow in Klaviyo?
There are 3 major elements in every flow:
- The trigger and its filters
- The time delays
- And the emails themselves
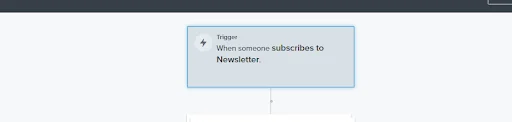
Starting with the trigger, the flow has to be sent when a user has joined one of your lists, so you need to set it up to be “Subscribed to list” and then select the list where users are added once they sign up through your forms.

You also need to add proper filters to prevent the flow from overlapping with other flows.
Add the following to prevent major overlaps:

That’s all! You’re all set with the trigger.
After you’re done with it, it’s time to assemble the flow using the drag-and-drop editor on the right.
Start with the first email that will be sent right after the trigger, and add the time delays and the other emails that will come after.
Here is a step-by-step technical guide to creating a Welcome flow:
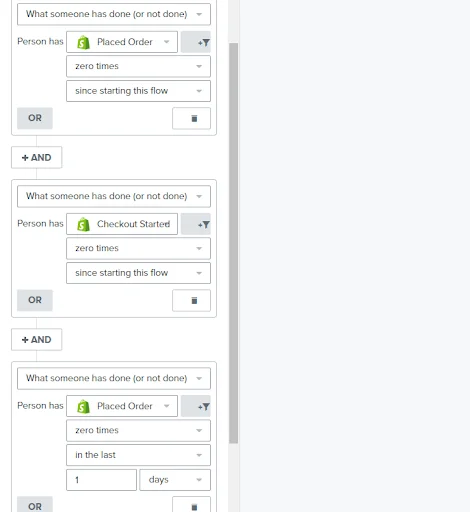
| Klaviyo >>> Flows >>> Create Flow >>> Create from scratch >>> Give a name to the flow (e.g., “Вelcome flow”) >>> What will trigger this flow: List >>> Where your forms link >>> Cick Flow Filters >>> Add flow filter >>> What someone has done or not done: zero times since starting this flow >>> Click AND >>> >>> Click AND >>> Placed order 0 times last 1 day (as on the screen below) >>> Save >>> Done >>> Assemble the sequence with the drag & drop flow editor |
What should I include in my Welcome flow?
Content-wise, welcome flows can be structured in different ways.
It can depend a lot on aspects like your niche, signup forms, audience, offers, and the way your website is built.
There are multiple possible combinations of emails, and you will have to figure out what works best for you and eventually test new options.
Down below, we’ve included 3 sample strategies for welcome flows with 3 emails each. Feel free to apply these to your brand, but at the same time, don’t see them as the only possible options.
Offer/gift-based (Sample brand: Fashion)
Assuming the traffic comes from the Homepage popup, which gives 10% off.
Email #1 – Welcome & build anticipation
The email must give the promised discount that was announced in the popup.
In addition, make sure to show appreciation to the new user for joining and talk about what emails they can expect from us in the future.
The discount code should be displayed and preferably made with a text block so it can be easily copy-pasted. Also, include a product block to present popular items right in the email.
Email #2 – Adding value to your brand + A reminder
In the email copy, summarize the About Us section of your website and connect your brand advantages to how they will benefit the user.
Make it conversational and easy to read. Also, include a short paragraph mentioning the discount they forgot to use. Use more images to display the looks and feel of your apparel.
Email #3 – Last chance
Emphasize the fact their discount code will expire soon to leverage urgency.
Point out how much time they have left and give instructions on how to use the discount code.
Be direct and clear. Again, leverage product blocks and imagery after the main copy section to grab the viewer’s attention with a piece they might like.
Lead magnet-based (Sample brand: Furniture store)
Assuming the popup promises a lead magnet – a guide on how to arrange furniture at home.
Email #1 – Welcome + Lead magnet access
Provide a link to the promised lead magnet. Welcome them to your newsletter.
Briefly describe how your store differentiates itself from all others and connect it to how the individual will benefit from it.
Mention that they’ve now signed up and build anticipation for future emails by mentioning what emails they will receive from us in the future. Include a block that demonstrates the main categories below the main section.
Email #2 – Category displaying + Social proof
Make the content of this email focused on showing various categories you have in the store – from living room furniture to kitchen accessories.
Summarize the idea of your store and point out why the recipient should buy from you and not from your competitors (price/quality/service/story/experience/other advantages your store has).
Also, you can add a short paragraph regarding the lead magnet that was sent with the previous email and a button to download it.
Email #3 – Оffer
Finally, in the 3rd email, you can give a discount offer.
If the recipient did not purchase from the previous emails (i.e., persuasion), a discount could be the thing that will make them buy.
Briefly and clearly describe the offer, add a code, and include a button with a call to action.
Community-based (Sample brand: Beauty brand)
Assuming the main popup is simply inviting users to join the brand’s newsletter community (no offers or lead magnets).
Email #1 – Welcome + Anticipation
The first email’s content would warmly welcome the user and appreciate them for joining.
The copy will also build anticipation for future emails by listing the types of future emails the user will receive (e.g., tips, advice, ebooks, offers, store updates, gifts, etc.).
In the end, there’s a CTA sentence inviting the users to click below and start shopping. The email can also have a product block with bestsellers and a blog block with the most popular articles.
Email #2 – About us & Our story
This email will dive deep into the story and the concept of the brand.
It could be a summarized version of the About Us section or even tell the whole story of how the brand was founded.
End the email with an inviting sentence to explore the products by clicking the button. Again, the email can have product and blog blocks.
Email #3 – Offer
A simple and direct email with a catchy offer. Clearly explaining what the discount is and how to use it.
Deadline in X amount of days can be mentioned to leverage urgency additionally. Dedicate a separate coupon block that clearly shows the code and include a product block below.
Avoid doing this… (Common mistakes)
Missing filters
We see this mistake in a lot of the accounts we are onboarding. It’s important to include the right filters in the Welcome flow to prevent overlap with other flows (like Abandoned Cart and Post-Purchase).
Overlap is when a user is in 2 or more flows at a time, meaning they are receiving multiple emails within a short timeframe.
In many cases, this will annoy a lot of users and drive unsubscribes and spam reports.
The Welcome flow must not be sent to people who started checkout or purchased also because the emails inside would simply be irrelevant to those segments (you shouldn’t promote and give discounts for a product the user just bought).
Right:

Wrong:
Wrong list
You must make sure the list where new subscribers are sent is the list that triggers the Welcome flow.
A misalignment here is a crucial mistake that can cost you a lot of results. That would simply prevent the Welcome flow from being sent to those who should receive it.
If you promised a discount in your popup that would come with the welcome flow, people would not receive it, and you’d end up with plenty of angry users and missed sales.


Segment-based filter instead of list-based
The welcome flow must be triggered when someone joins a list and not when they join a segment, even if that segment includes those who just joined from your popups.
The reason behind this is the technical factor that when a segment is used as a trigger, there is typically a relatively large delay for the trigger (1-2 min) that might cause problems if you want the first email to be sent as soon as possible after signup.
Double opt-in turned on
Double opt-in is a feature that sends the subscriber an email confirmation where the user needs to click a button to enter the list and start receiving emails from you.
While it can be useful in certain situations when deliverability is damaged, it’s normally better to turn it off as it filters out a large portion of the traffic of the Welcome flow, which eventually decreases its generated revenue.
Double opt-in is not legally required in the US and EU (even with the GDPR). It’s a relatively broad topic we will produce a separate post about in the future.
For now, however, it’s good to remember that it’s better to have it turned off unless your account deliverability is damaged.
In conclusion
We hope this guide will help you set up a Welcome flow that will generate great results.
If you have any questions about or feedback about this article, we’ll be more than happy to hear from you! Our email address is always “open” – office@progs.agency
Once you’ve set up your Welcome flow, it’s good to keep in mind it’s not the end of it – you can always optimize it to gain better results or test ideas that could work better.
We have a complete guide to flows and their optimization. If you are interested in checking it out, we invite you to do so HERE.